User guide

How to use Hush.

Everything from first launch to the power-user settings. Part 1 walks you through the core flows; Part 2 documents every Settings tab. Hush runs on macOS 26+ with Apple Speech, or macOS 14+ with WhisperKit — Apple Silicon recommended.

Part 1

Getting started

The core loop takes a second to learn: hold a key, talk, release — and the text lands right at your cursor. Here's everything around it, in order.

Install & first launch

Hush is a direct download — notarized by Apple, no App Store, no account.

  1. Download the DMG from the Hush site and open it.
  2. Drag Hush into your Applications folder.
  3. Launch it. Hush lives in the menu bar (the waveform icon) — click it for status and quick actions, or choose Open Hush for the main window.

Hush is a menu-bar app: closing the window doesn't quit it. Quit from the menu bar when you really want it gone. Updates arrive automatically via Sparkle.

Grant permissions

macOS asks for three permissions, each in plain language and only when first needed.

  1. Accessibility — lets Hush capture the global hotkey and paste at your cursor. Grant it from the in-app banner or Settings → General. The menu bar reads Ready once it's on.
  2. Microphone — to record your voice. Prompted the first time you record.
  3. Screen Recording — only for Meetings, to capture the other side's system audio. Prompted the first time you start a meeting.

Apple Speech (macOS 26+) also uses Speech Recognition; it's requested implicitly the first time you use it.

Choose your engine

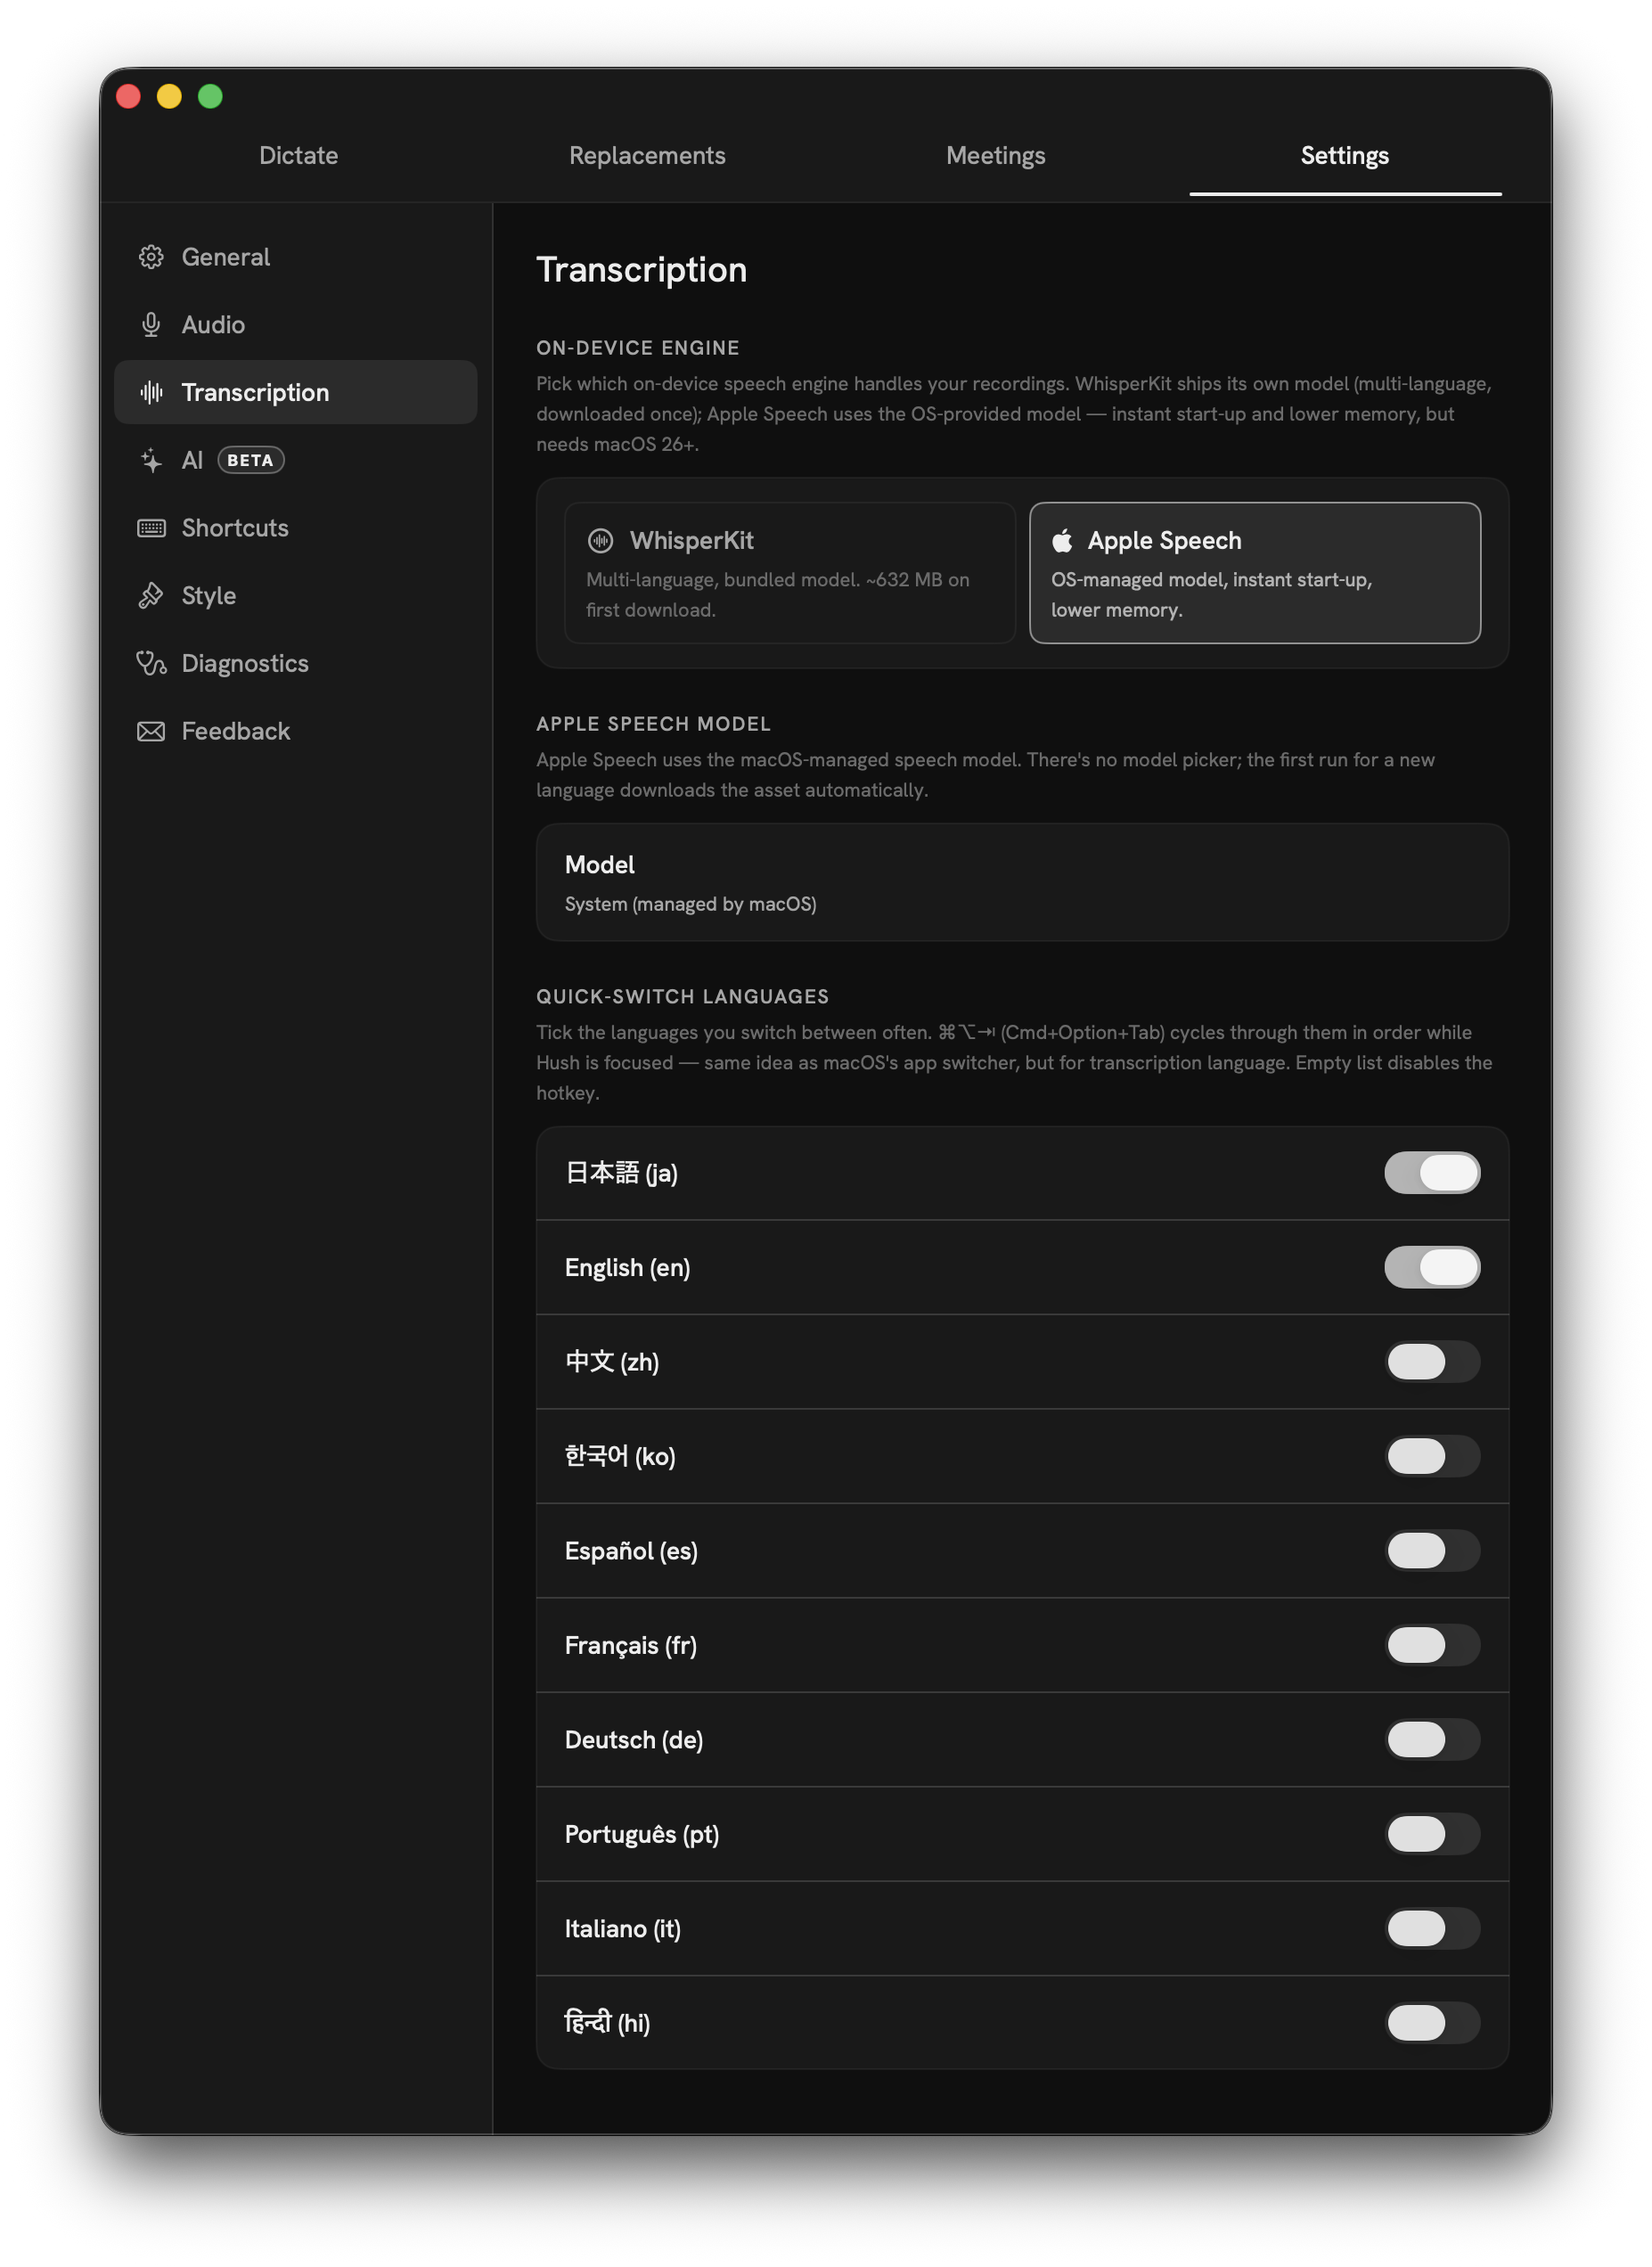
Transcription runs on your Mac. In Settings → Transcription, pick the on-device engine:

  1. Apple Speech — the default on macOS 26+. Built in, nothing to download, managed by the OS.
  2. WhisperKit — macOS 14+, 100+ languages, and Hush's strongest Japanese. Choose a model size; Large-v3-Turbo (~632 MB) is the most accurate.

WhisperKit downloads its model once (about a minute on Wi-Fi) — a banner shows progress, then everything works offline. Apple Speech pulls a small per-language asset on first use.

Settings, Transcription tab — engine and model pickers
Settings → Transcription — engine and model live here.

Push-to-talk dictation

The core move. Hold the chord anywhere, talk, and release — the words stream in live, then land at your cursor (a synthetic ⌘V into whatever app is focused).

  1. Hold fn Space from any app and start speaking.
  2. Release to insert the finished text where your cursor is.
  3. Prefer a button? Click the mic in the Dictate tab to record into the app instead.
Keys: fn Space hold to talk Esc cancel

Edit, search & copy

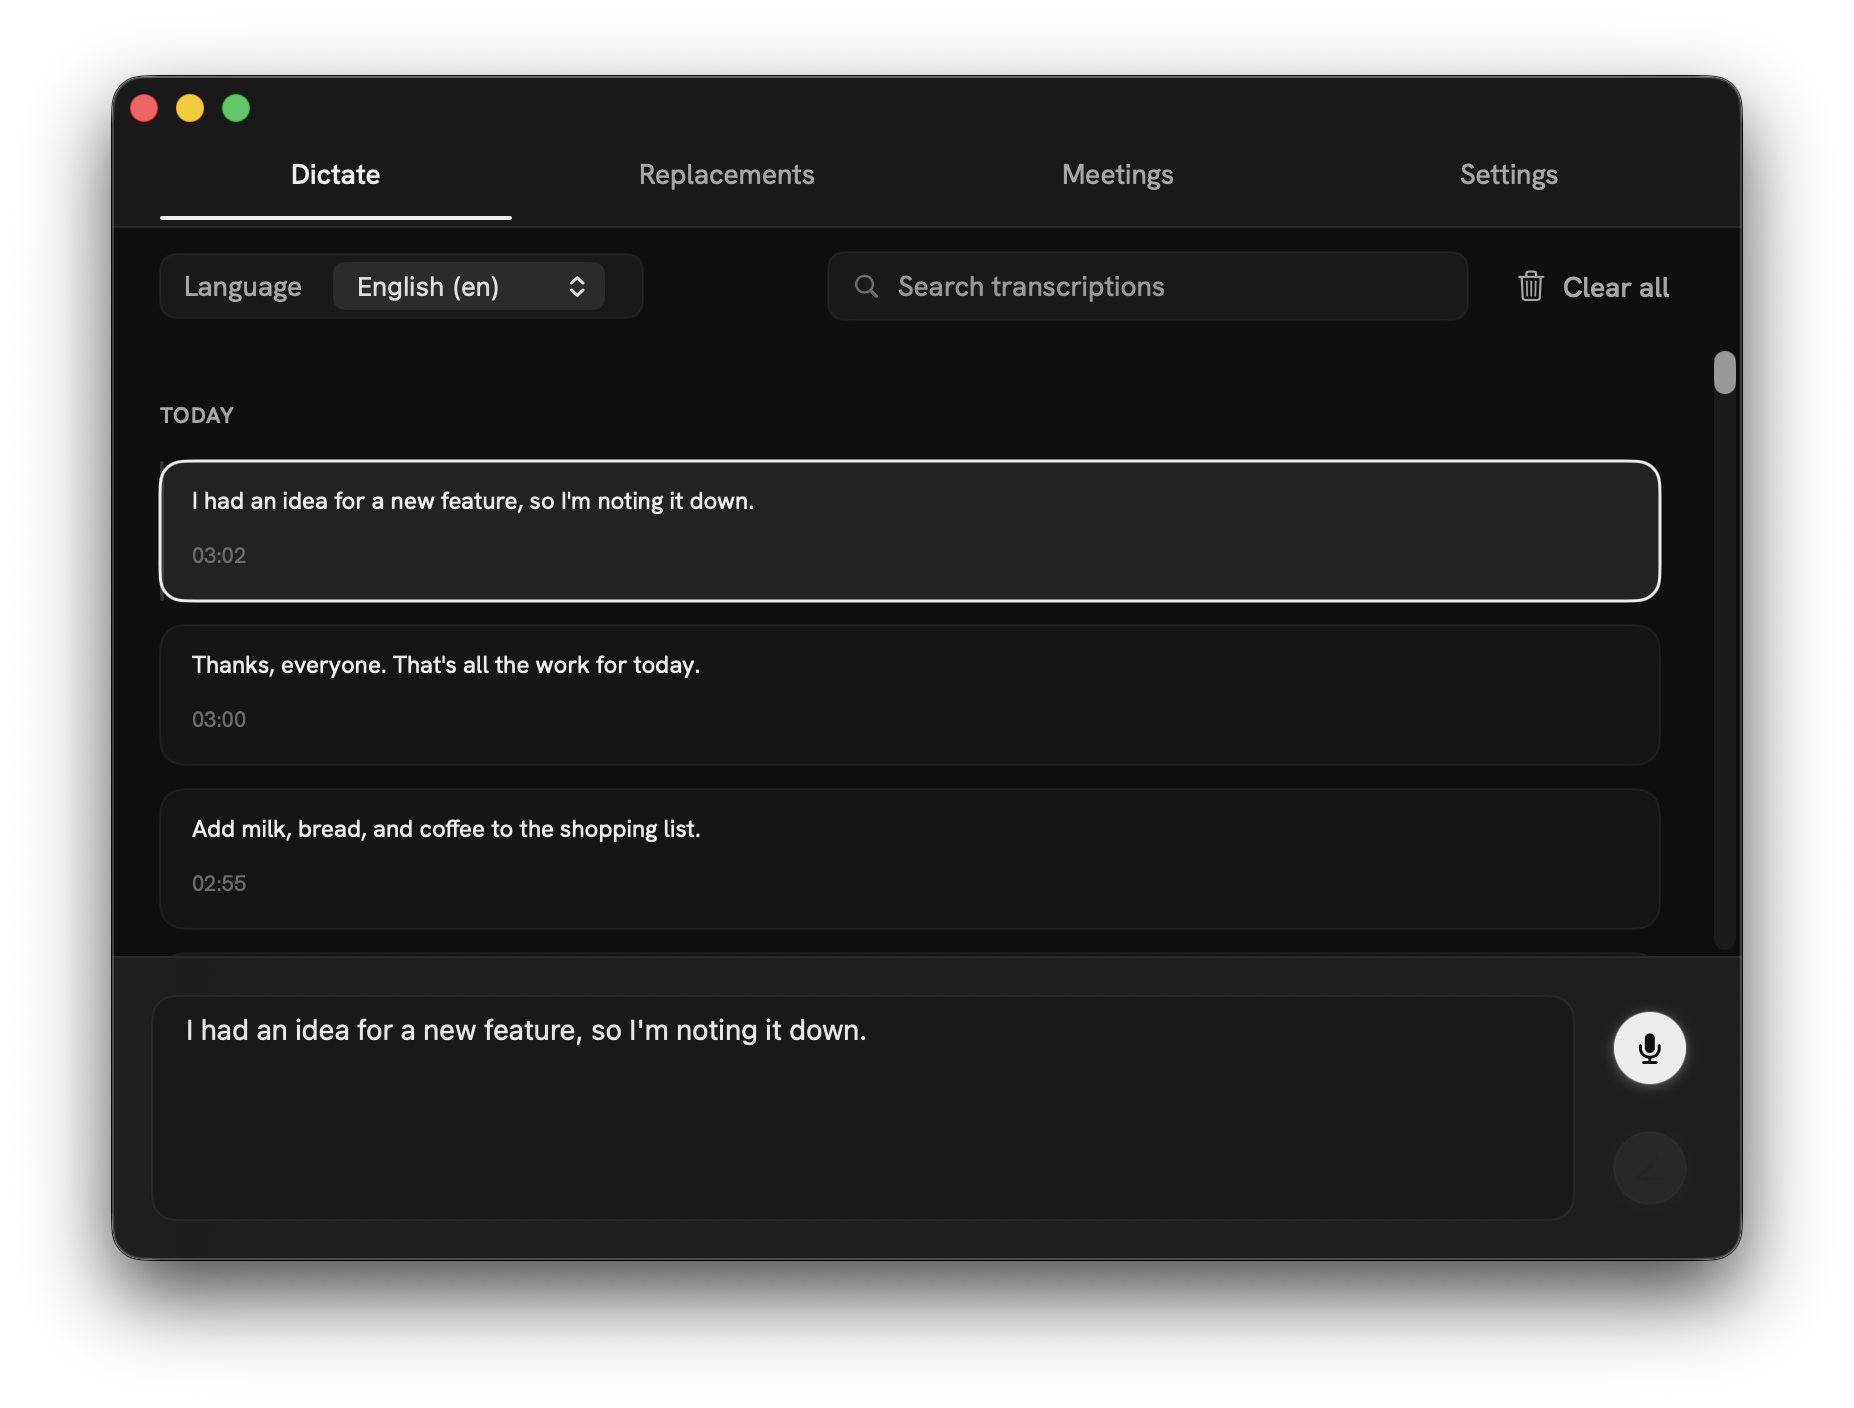
Every dictation is saved in the Dictate tab as a chat bubble, so you can always come back to it.

  1. Tap a bubble to edit it inline. ⌘ Return applies your change; Esc discards it.
  2. Use the search field to filter history, and the language picker to set the language of your next transcription.
  3. Turn on auto-copy to clipboard in Settings → General to copy each result automatically.

History keeps your most recent entries (100 by default, configurable). Clear all wipes it, with a confirmation.

Dictate tab showing transcript history bubbles, search and chat bar
The Dictate tab — searchable history you can edit and copy.

Voice edit

Editing by voice, not just dictation. Point at a transcript and say how to change it.

  1. Select a bubble (or some text), then hold fn ⌃Space and speak the change — "make this a bullet list", "fix the name to Kenichi".
  2. With AI features on, Claude or OpenAI applies the edit and shows a preview: ⌘ Return to apply, Esc to discard.
  3. With AI off, your spoken text simply replaces the target.

Voice edit and AI Polish require AI features to be enabled (Settings → AI) with your own API key.

Meetings

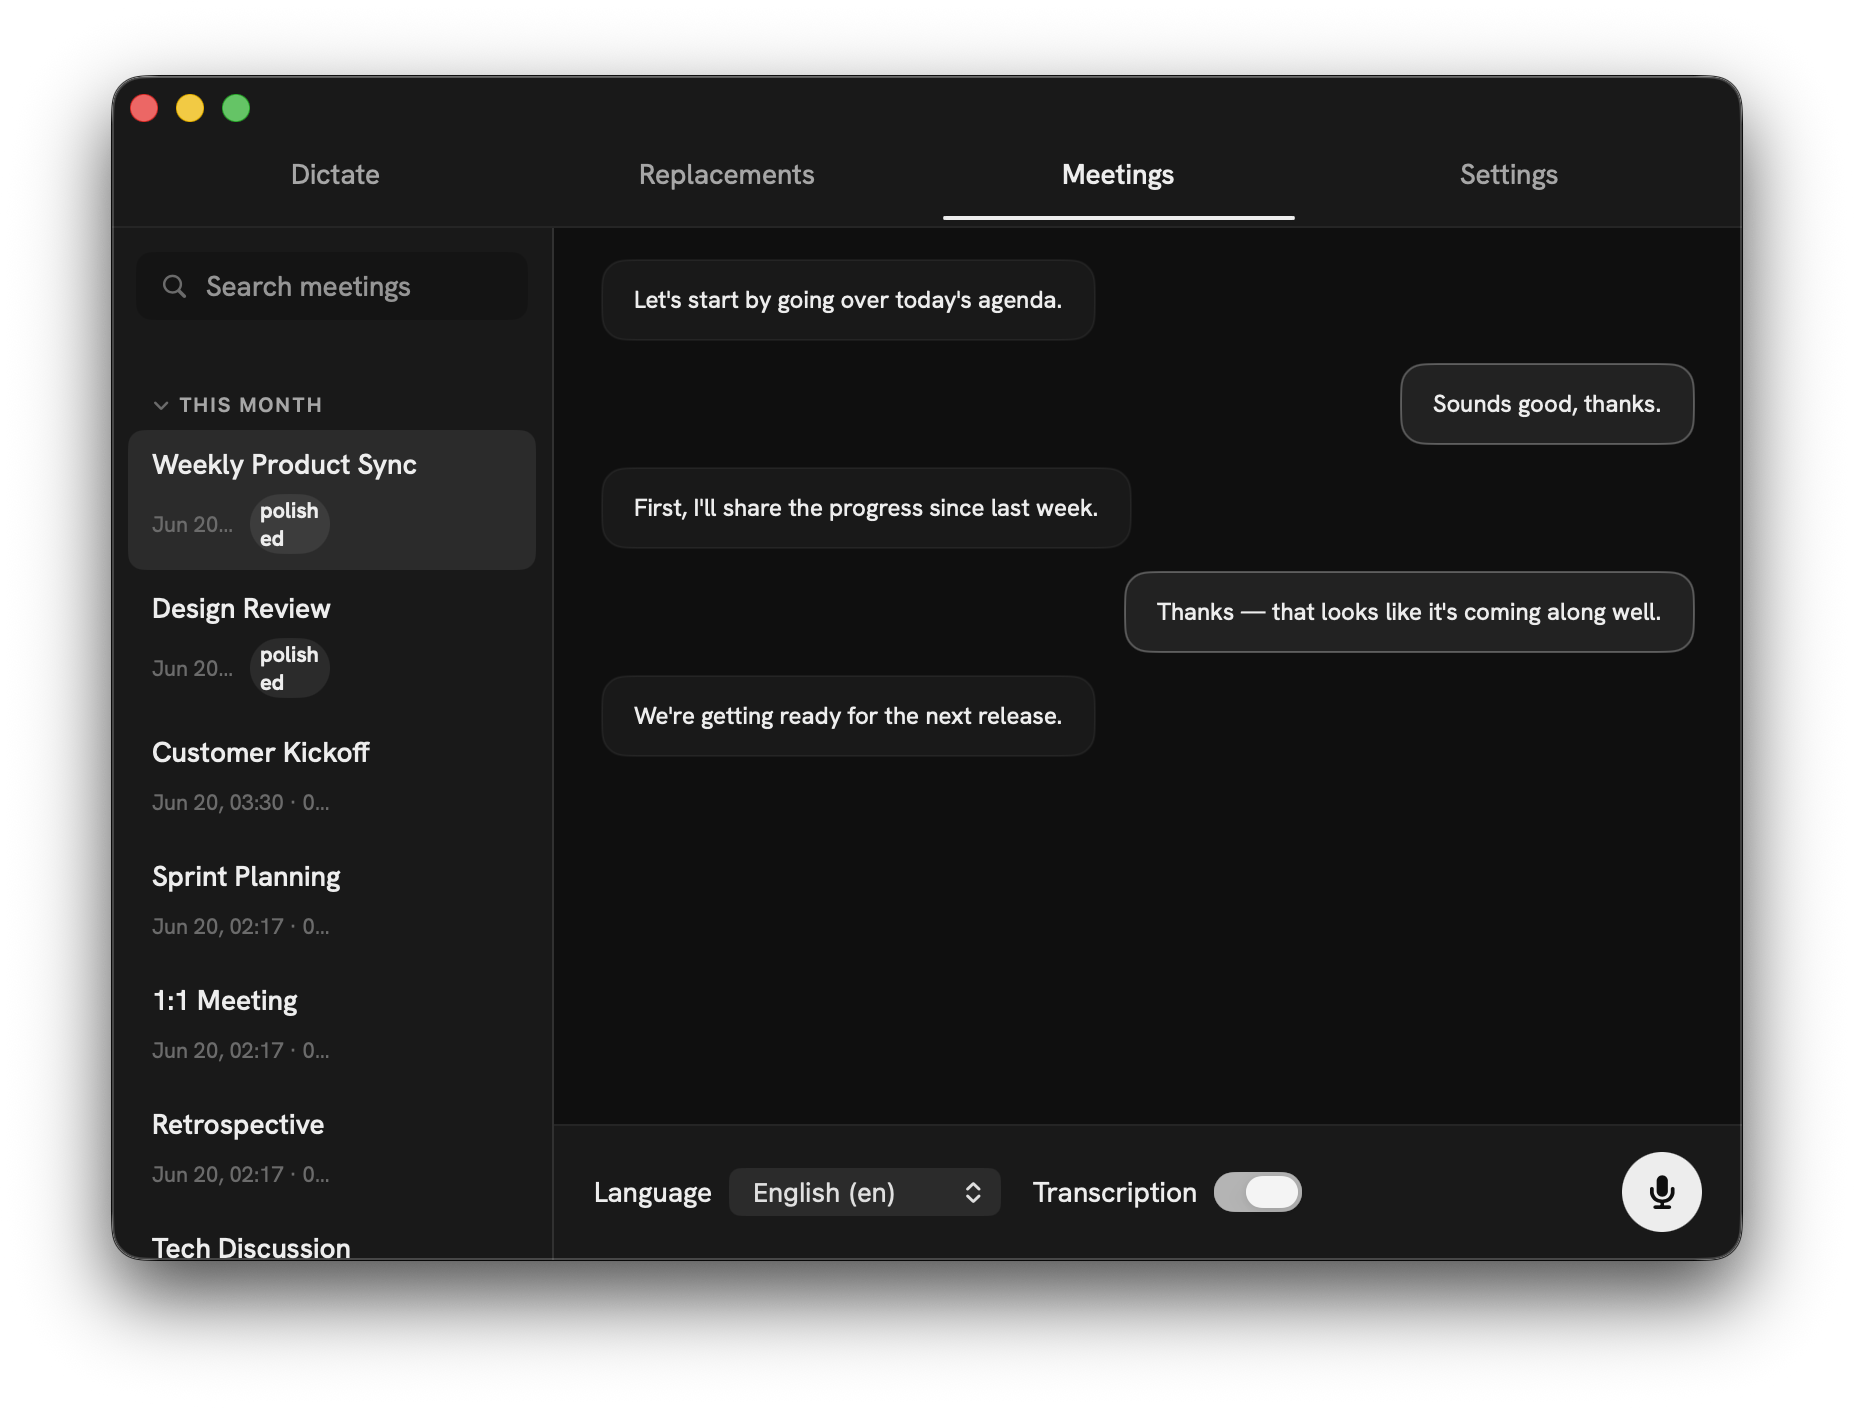
Hush records your mic and the system audio as two separate on-device streams, so the live transcript already tells "Me" from "Them" — no after-the-fact diarization. One press of fn ⇧Space starts recording, even for a call that lands out of nowhere, and when it's over you can copy the whole transcript straight into your minutes or summary. Works right alongside Zoom, Meet, or Teams.

  1. Press fn ⇧Space (or the button in the menu bar / Meetings tab) to start.
  2. Watch the live chat-bubble transcript — Me on one side, Them on the other.
  3. Press again to stop. The meeting is saved with a speaker-labelled transcript.
  4. Per meeting: rename, copy raw, copy polished, polish with AI, or delete.

Meetings need Screen Recording permission for the other side's audio. If "Them" stays silent for a while, a banner reminds you to check it.
Saved meeting detail with raw and polished transcript toggle
Afterwards — raw and AI-polished transcripts, ready to copy.

Customise

Replacements

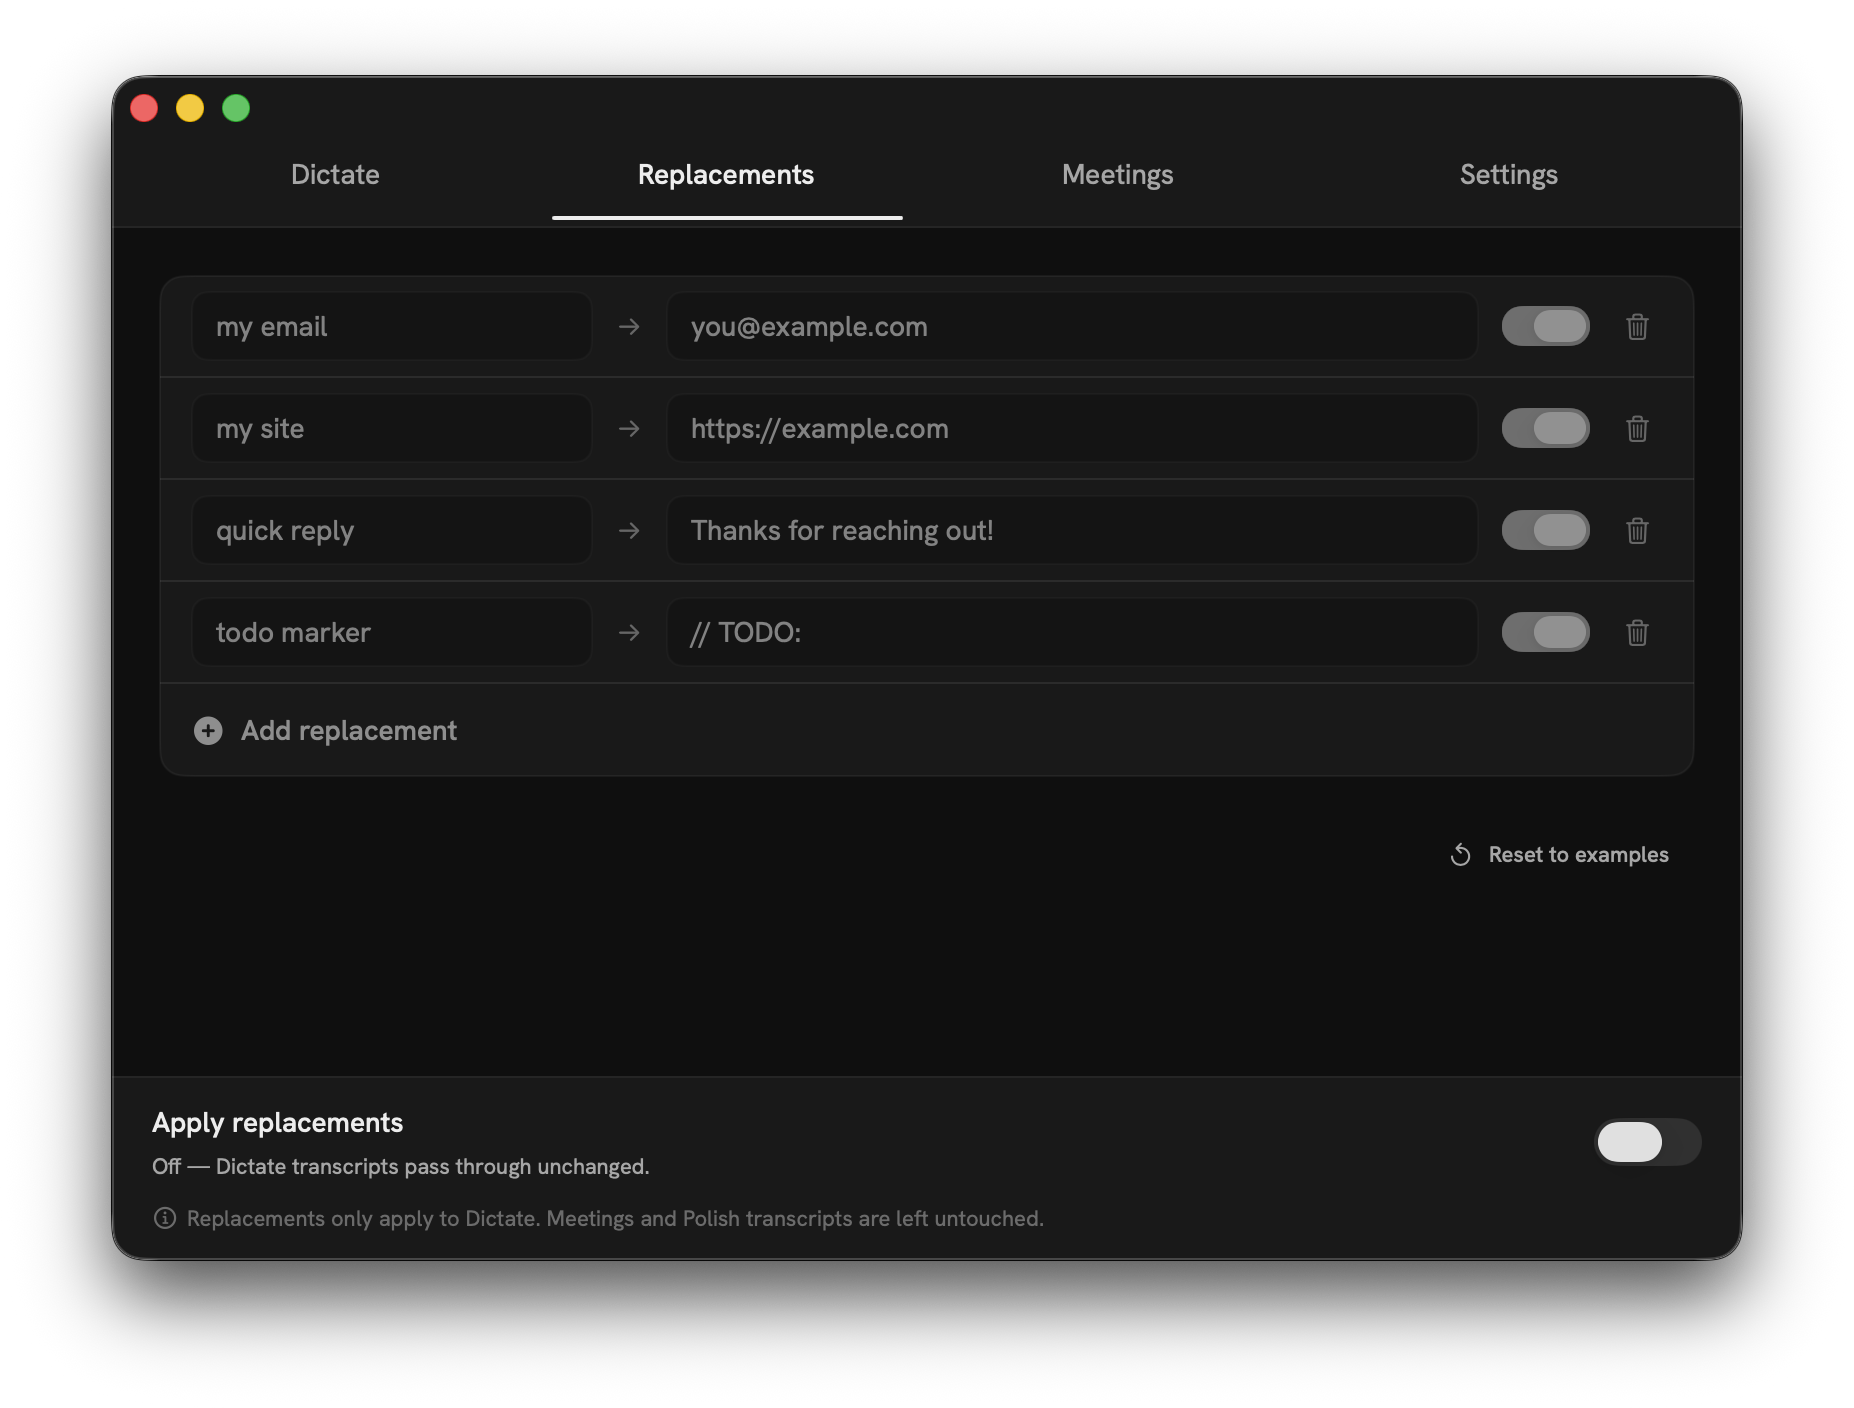
Teach Hush your acronyms, names, and boilerplate, and it swaps them in automatically after every dictation. Manage your rules from the Replacements tab.

Replacements tab with substitution rules

How it works

Each rule turns a spoken trigger into replacement text, applied deterministically on every finished dictation.

Add a rule
Trigger (what you say) → replacement (what's inserted) — e.g. "my email" → you@example.com.
Apply replacements
Master toggle. Off = dictation passes through unchanged.
Scope
Dictate only — Meetings and AI Polish transcripts are left untouched.

Part 2

Settings reference

Every tab in Settings, and what each control does. Open Settings from the in-app tab bar or the menu bar.

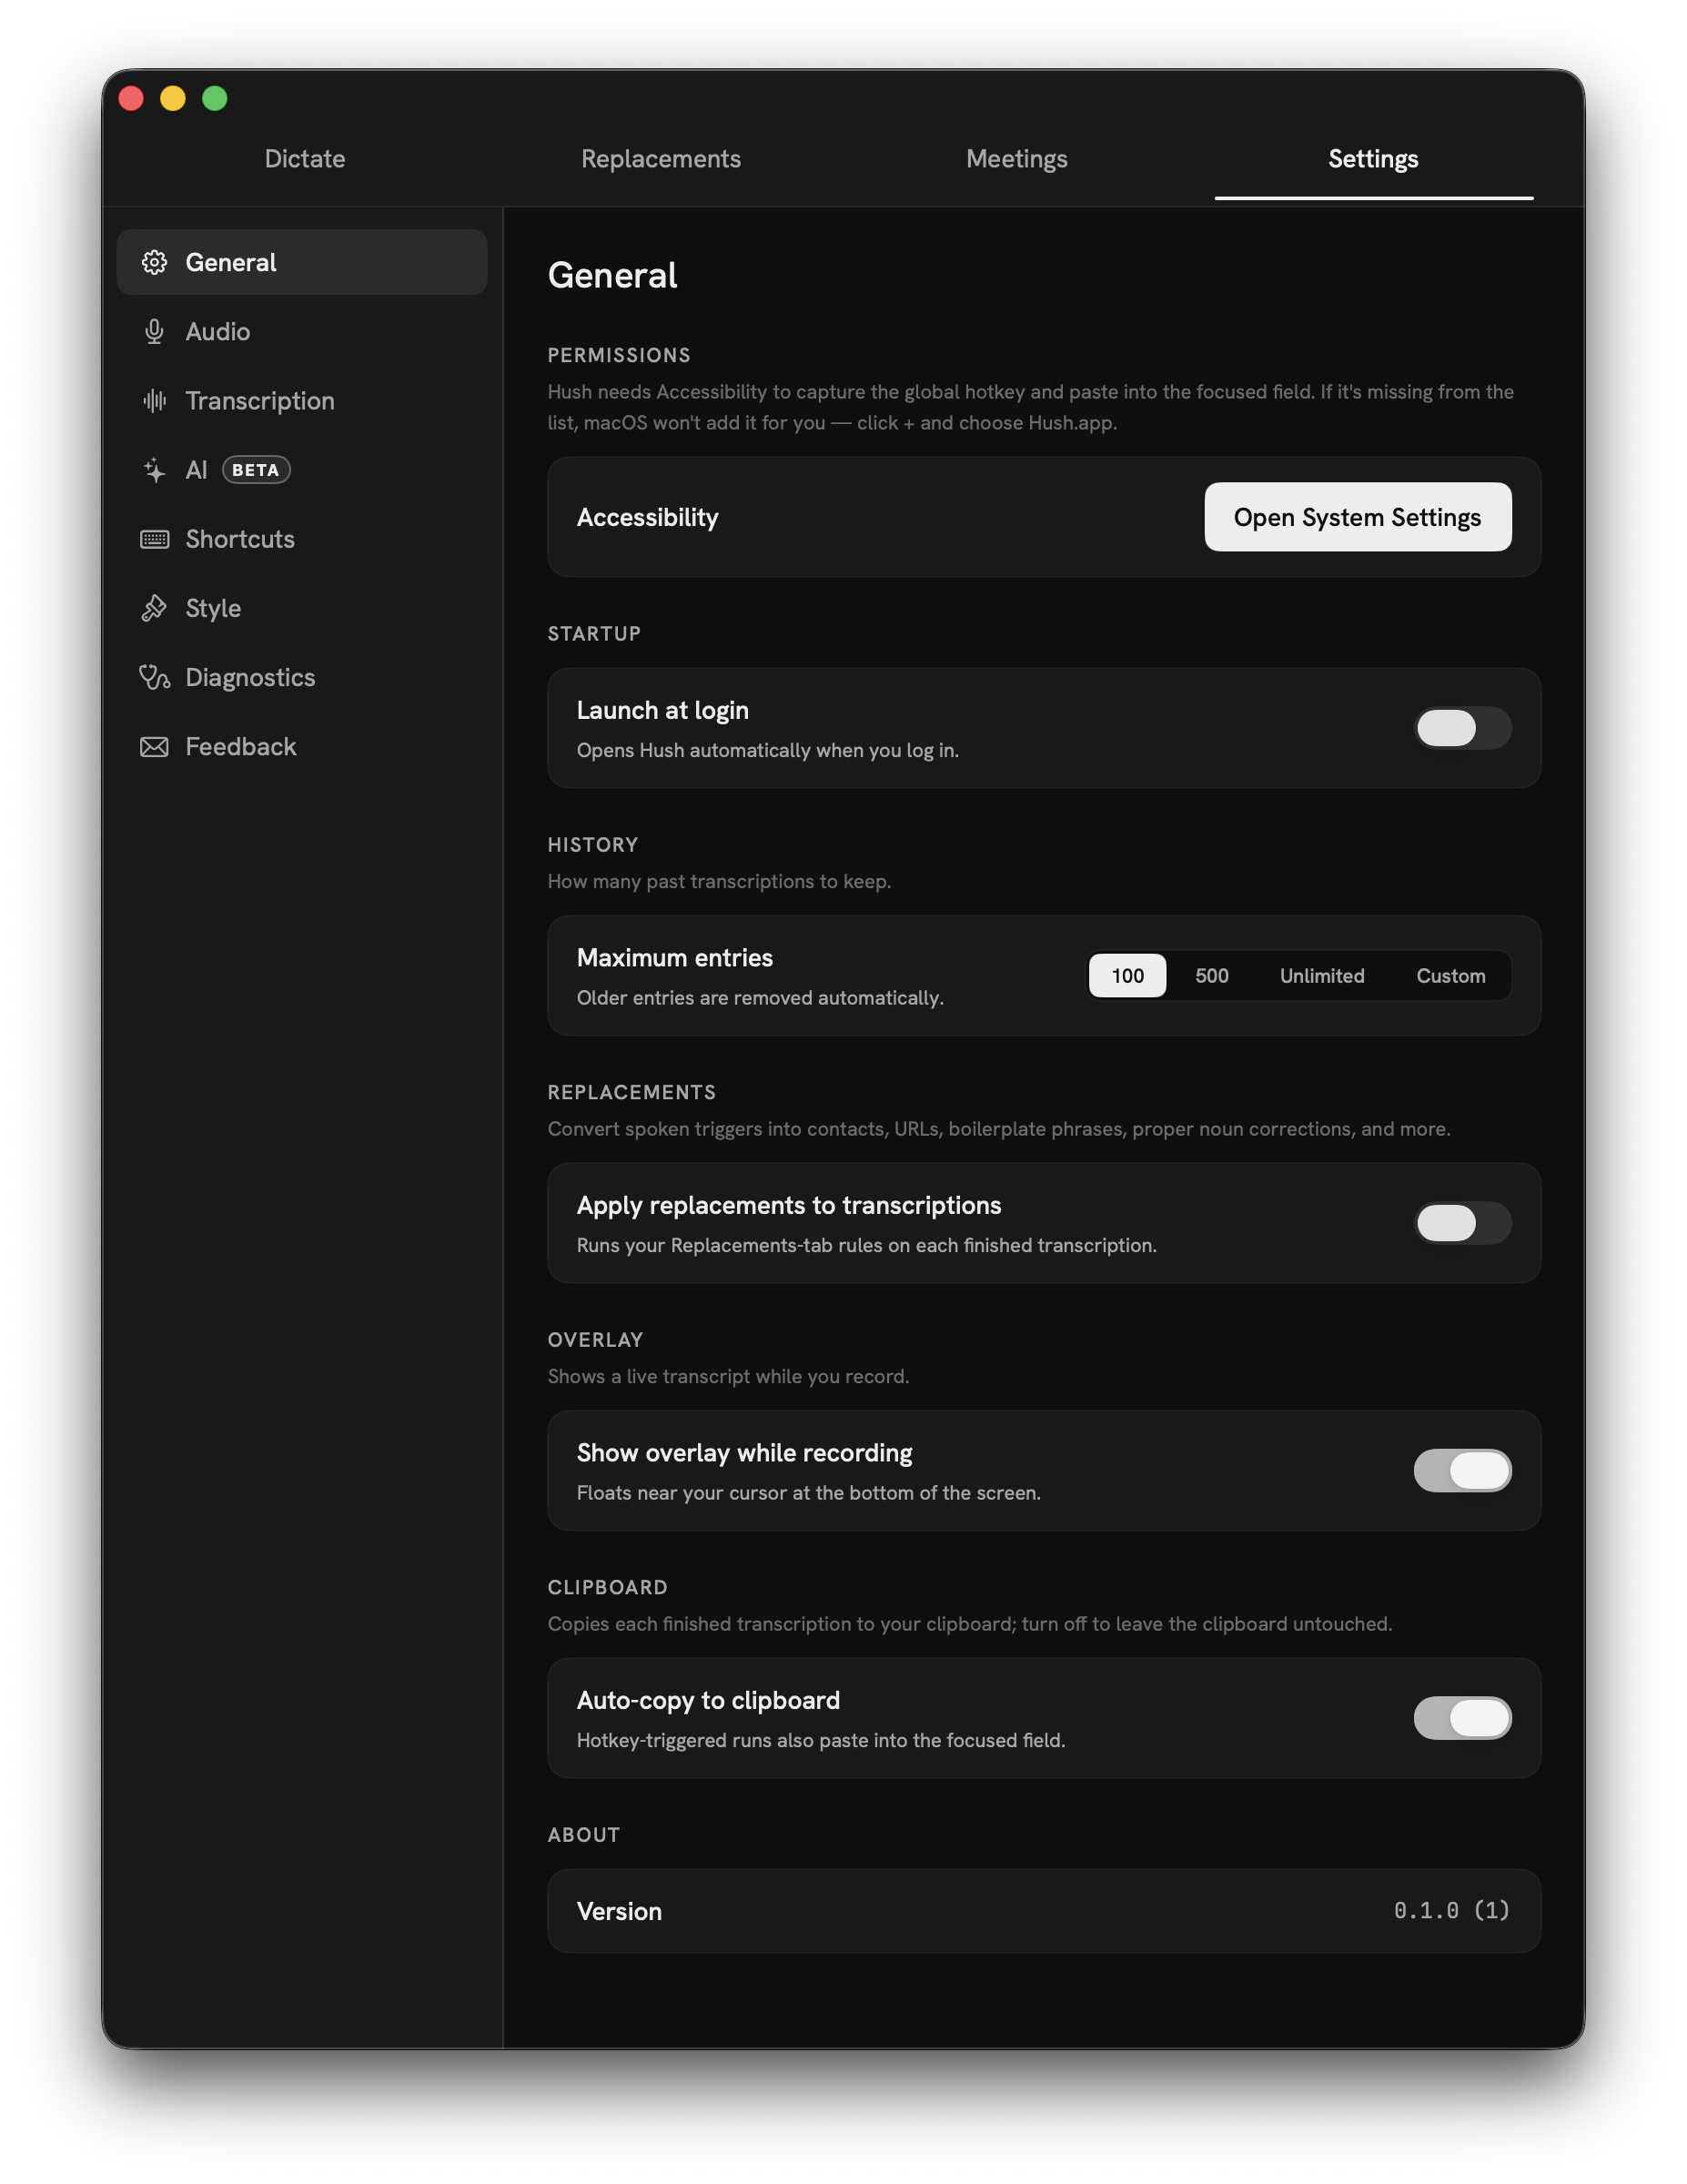
Settings, General tab

General

Permissions, startup, history, and clipboard behaviour.

Permissions
Jump to Accessibility in System Settings — needed for the hotkey and paste.
Launch at login
Start Hush automatically when you log in.
History limit
Keep 100, 500, unlimited, or a custom number; oldest entries auto-clean.
Replacements
Master toggle for phrase expansion (applies to Dictate only).
Overlay
Show the live transcript overlay while recording.
Clipboard
Auto-copy each result; hotkey runs also paste into the focused field.
About
Current version and build.
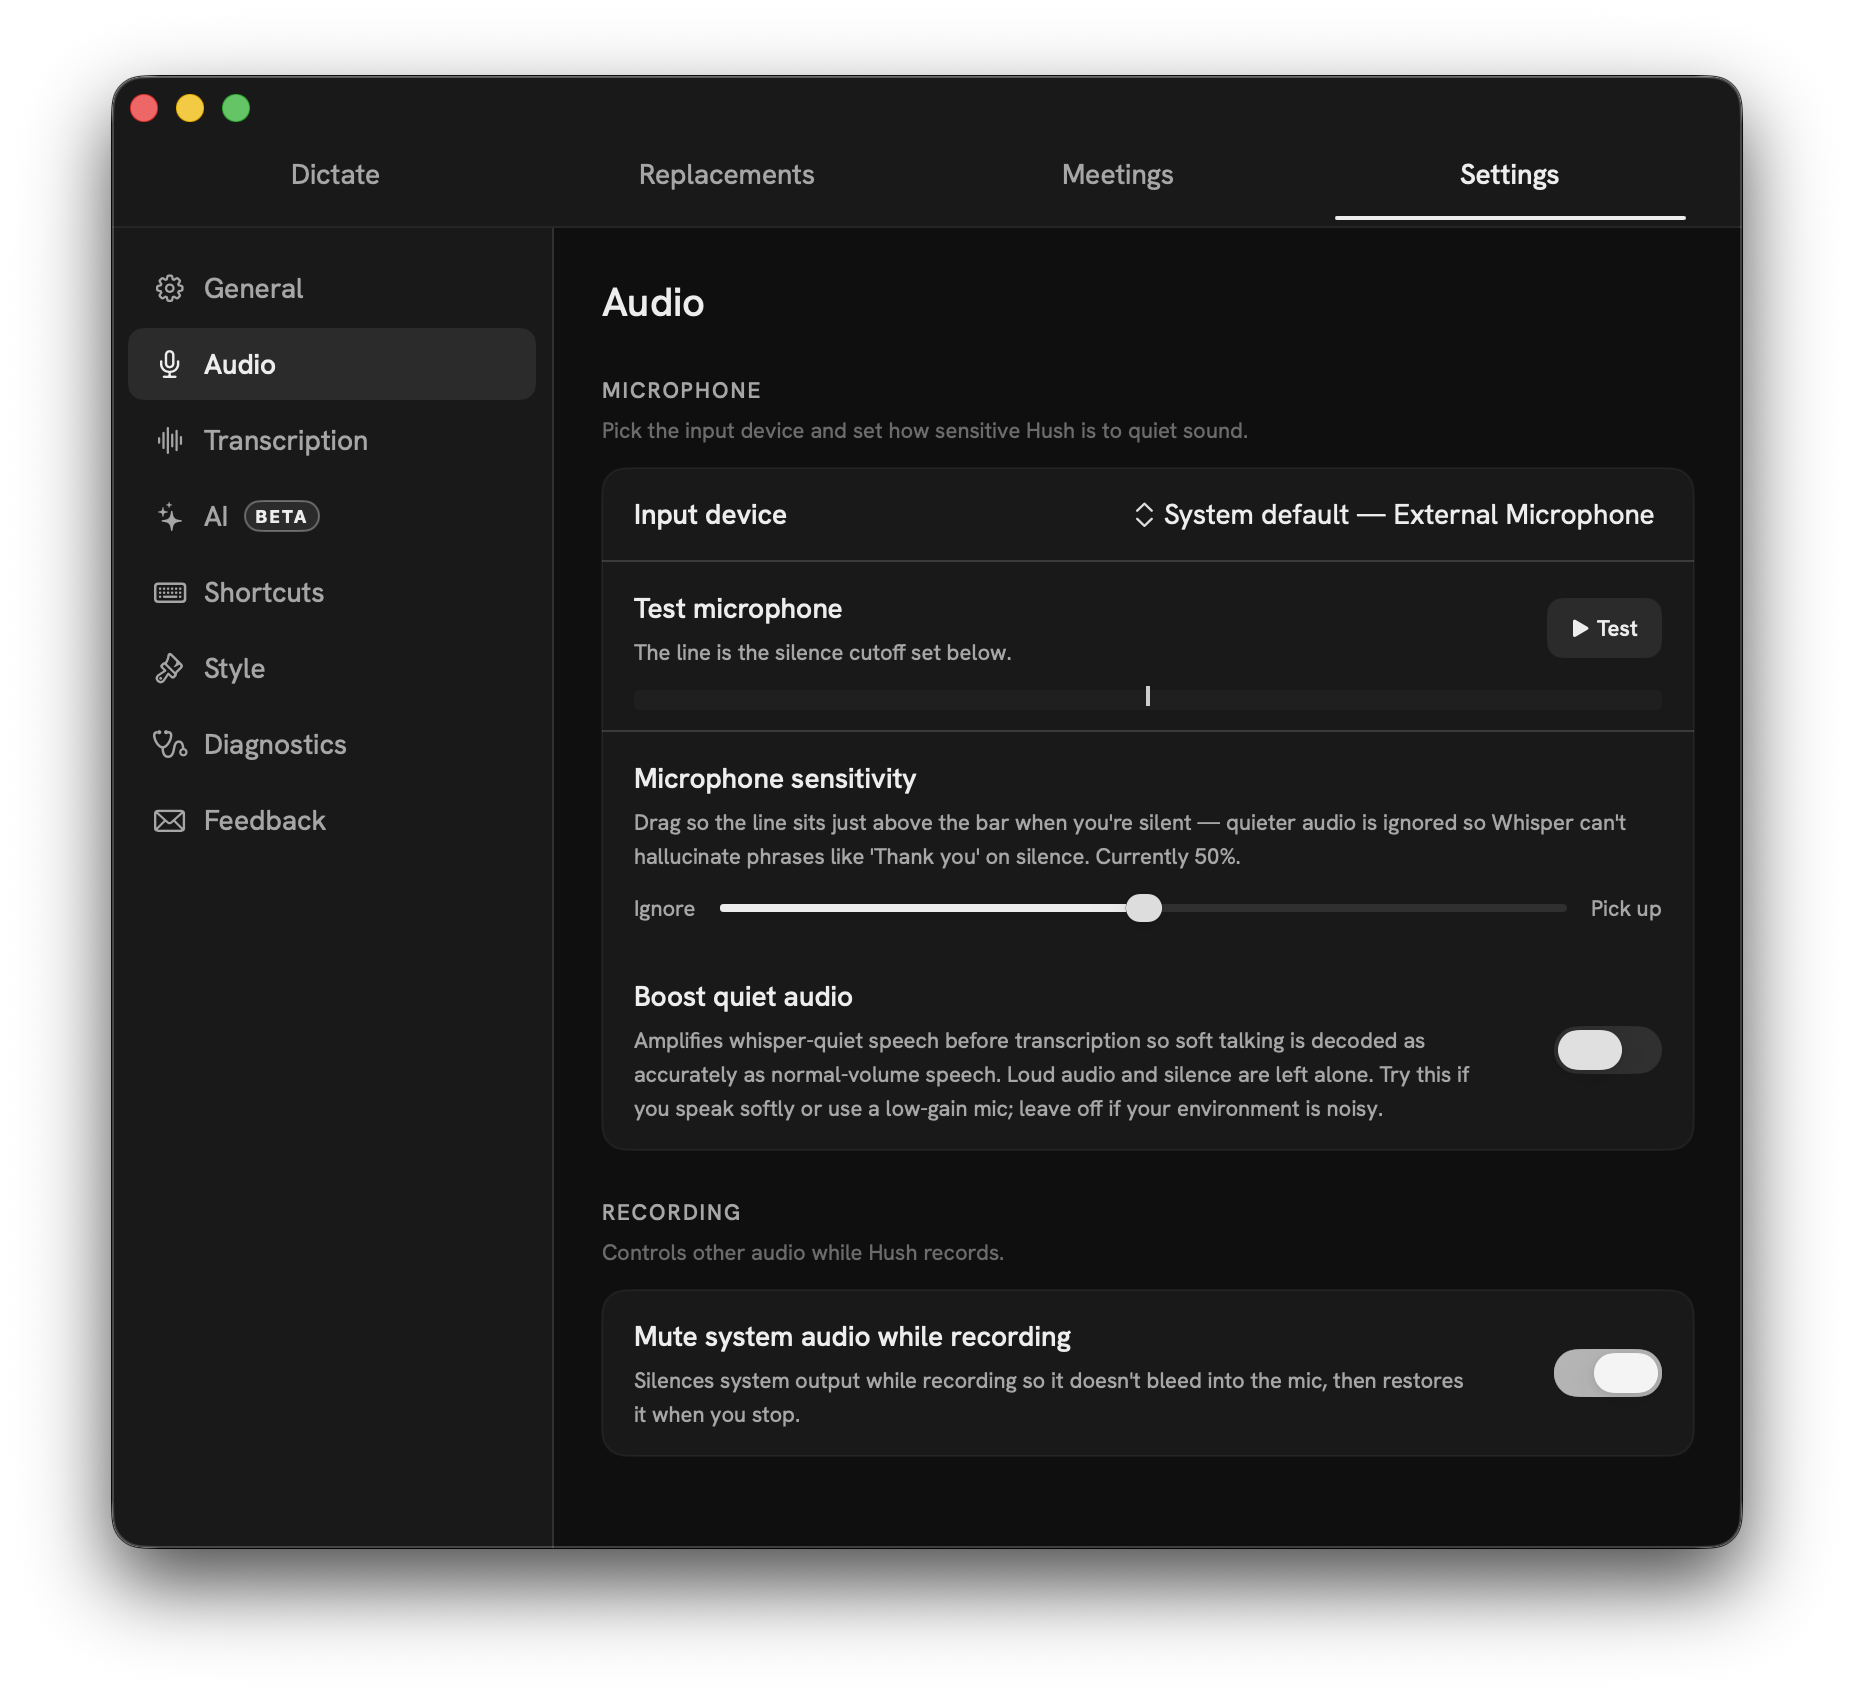
Settings, Audio tab

Audio macOS

Pick your microphone and tune the input level.

Input device
Choose which microphone Hush records from.
Test microphone
A live level meter to confirm you're being heard.
Boost quiet audio
Lift low-volume input; pair with the sensitivity slider.
Mute system audio while recording
Silences output so it doesn't bleed into the mic.
Settings, Transcription tab

Transcription

The on-device engine and language behaviour (see step 3).

On-device engine
WhisperKit (macOS 14+) or Apple Speech (macOS 26+).
WhisperKit model
Bigger = more accurate, but uses more RAM. Large-v3-Turbo recommended.
Apple Speech
Managed by macOS; per-language assets download on first use.
Quick-switch languages
The list you cycle with ⌘ ⌥ Tab. Empty disables the shortcut.
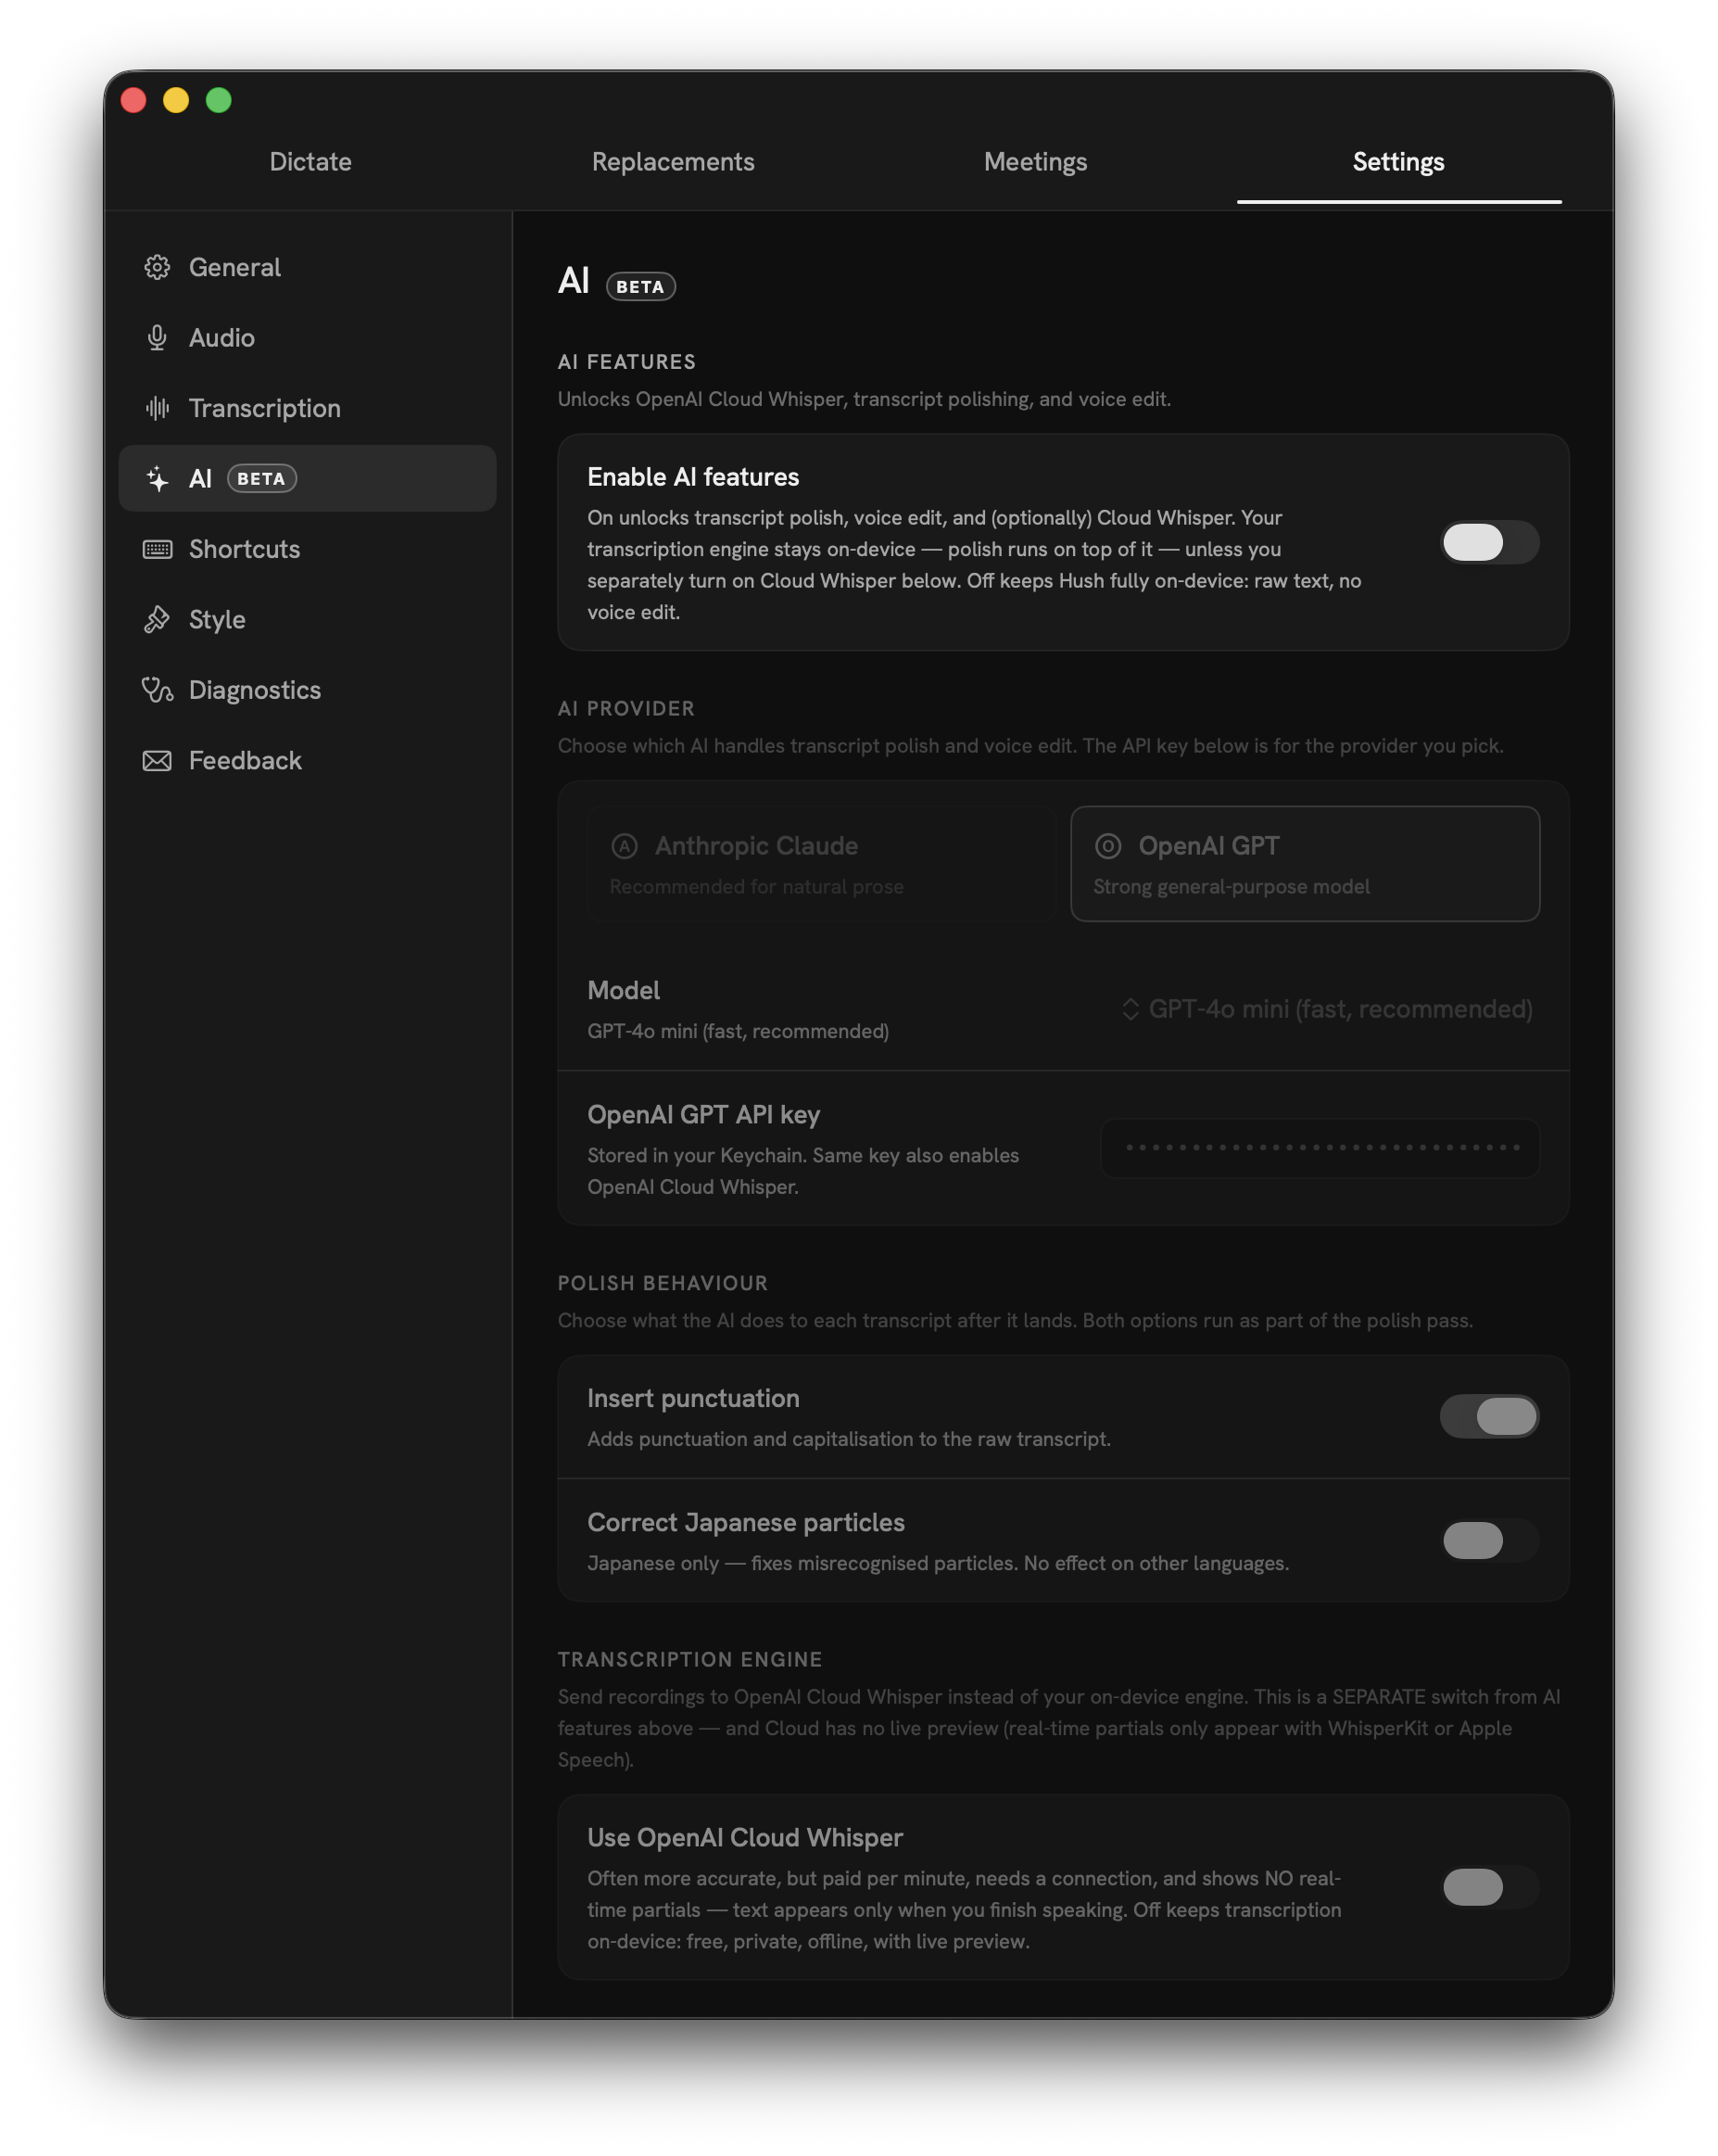
Settings, AI tab

AI Beta

Optional, off by default. Bring your own key — billed by the provider, no surcharge.

Enable AI features
Unlocks Polish, Voice edit, and Cloud Whisper. Off = fully on-device.
Provider & model
Anthropic (Claude) or OpenAI (GPT), with a model dropdown.
API key
Your own key, stored in the macOS Keychain.
Polish behaviour
Insert punctuation and/or correct particles (language-specific).
Cloud Whisper
Transcribe via OpenAI Whisper — more accurate, ~3–5× slower.
Compare mode
Run on-device and cloud in parallel and compare.
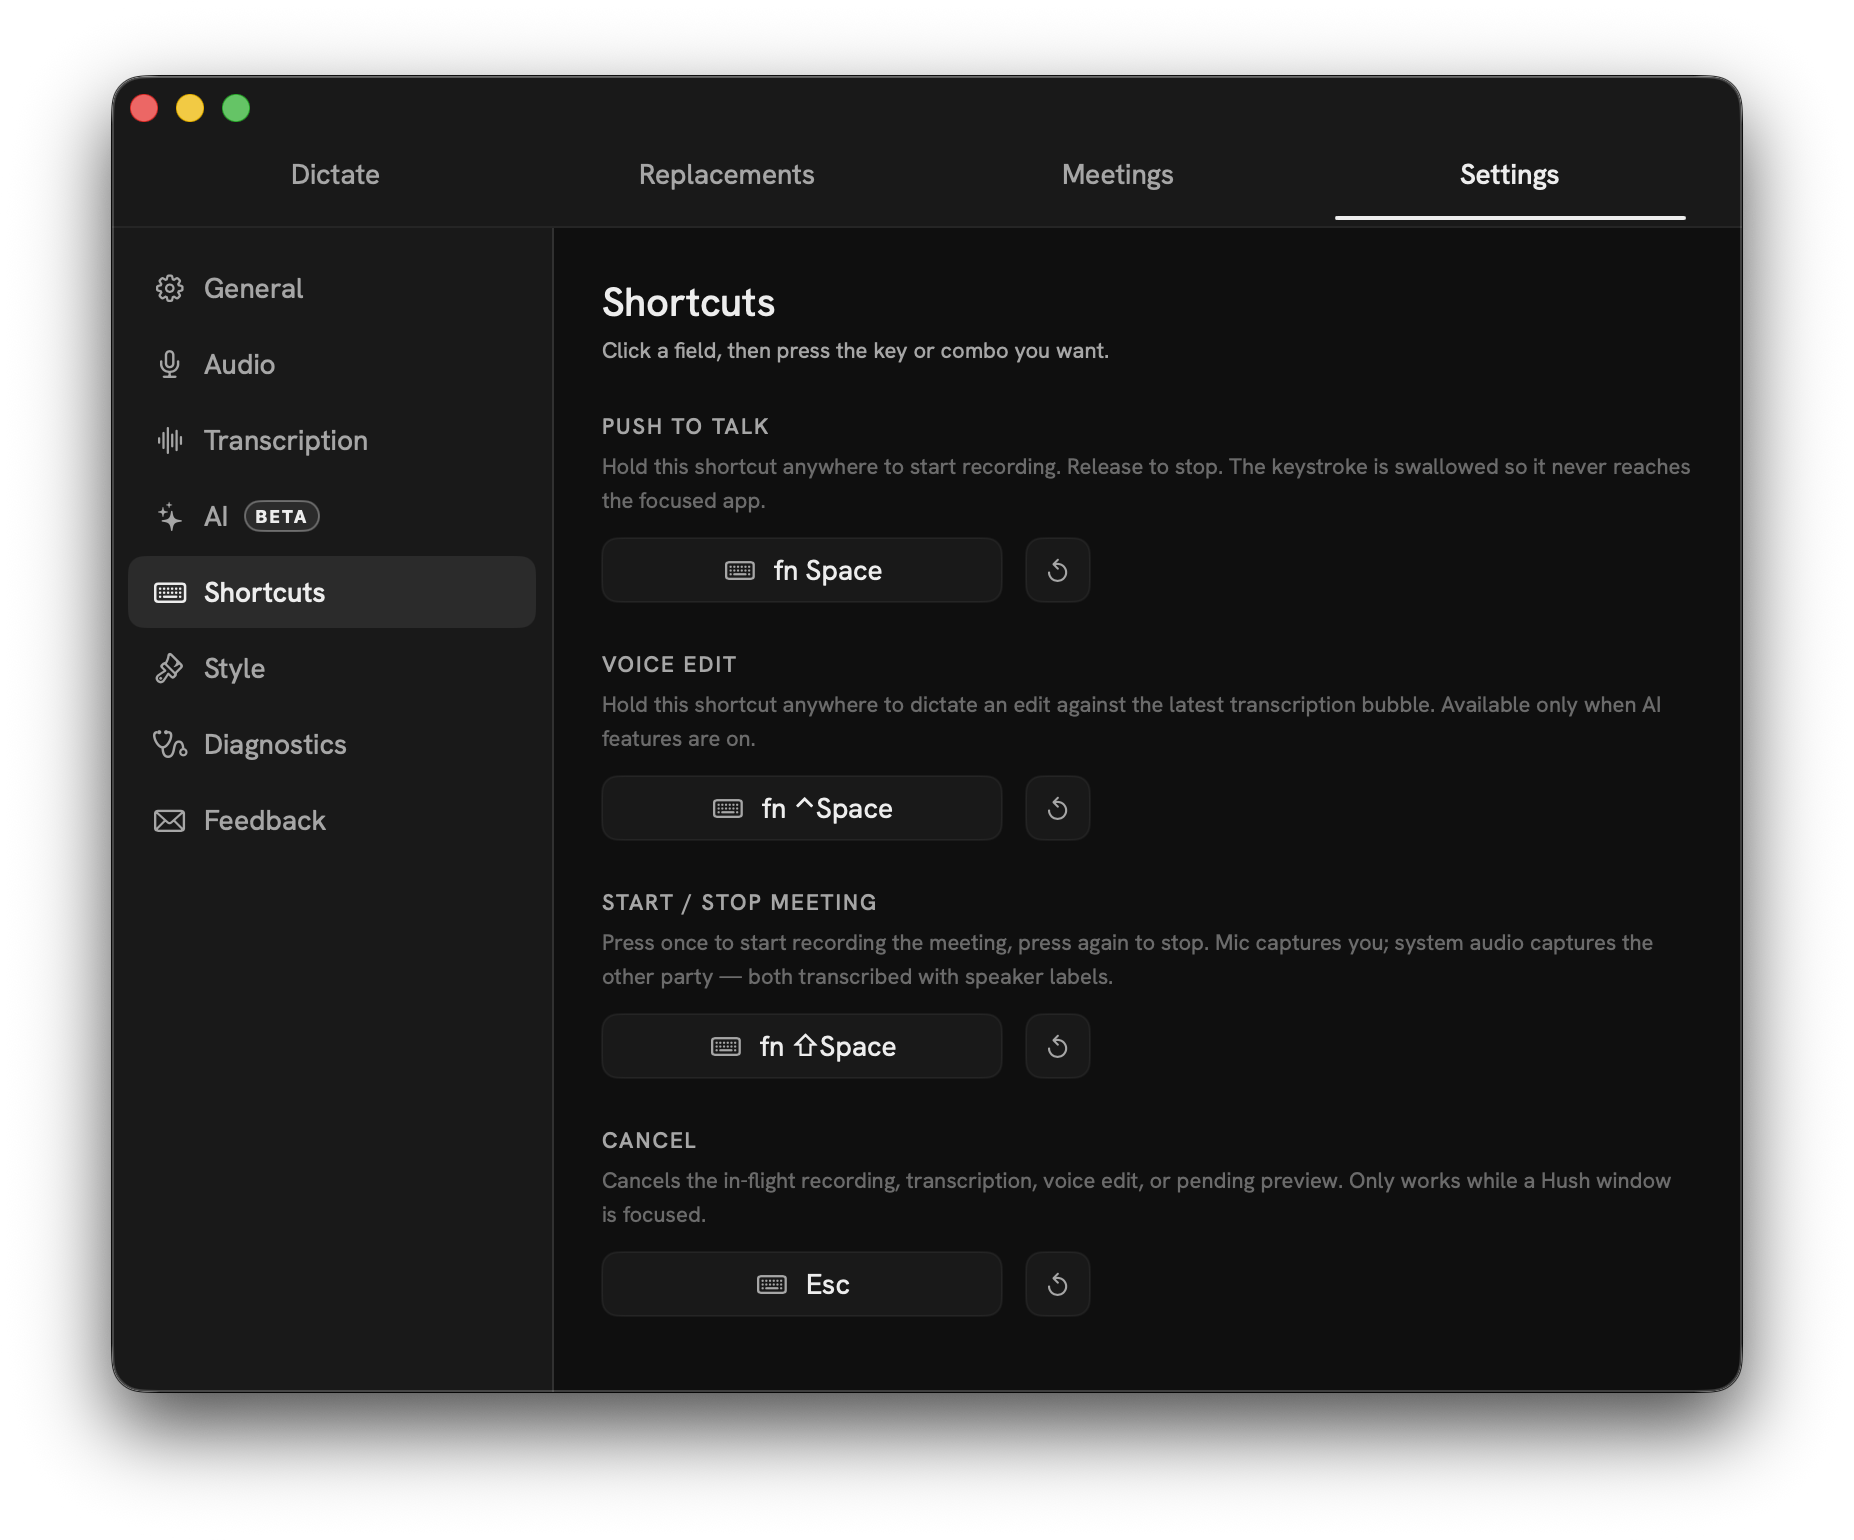
Settings, Shortcuts tab

Shortcuts macOS

Rebind any chord — click the field and press your combo. Reset restores the default.

Push to talk
Default fn Space.
Voice edit
Default fn ⌃Space (AI features only).
Start / stop meeting
Default fn ⇧Space.
Cancel
Default Esc; works while a Hush window is focused.
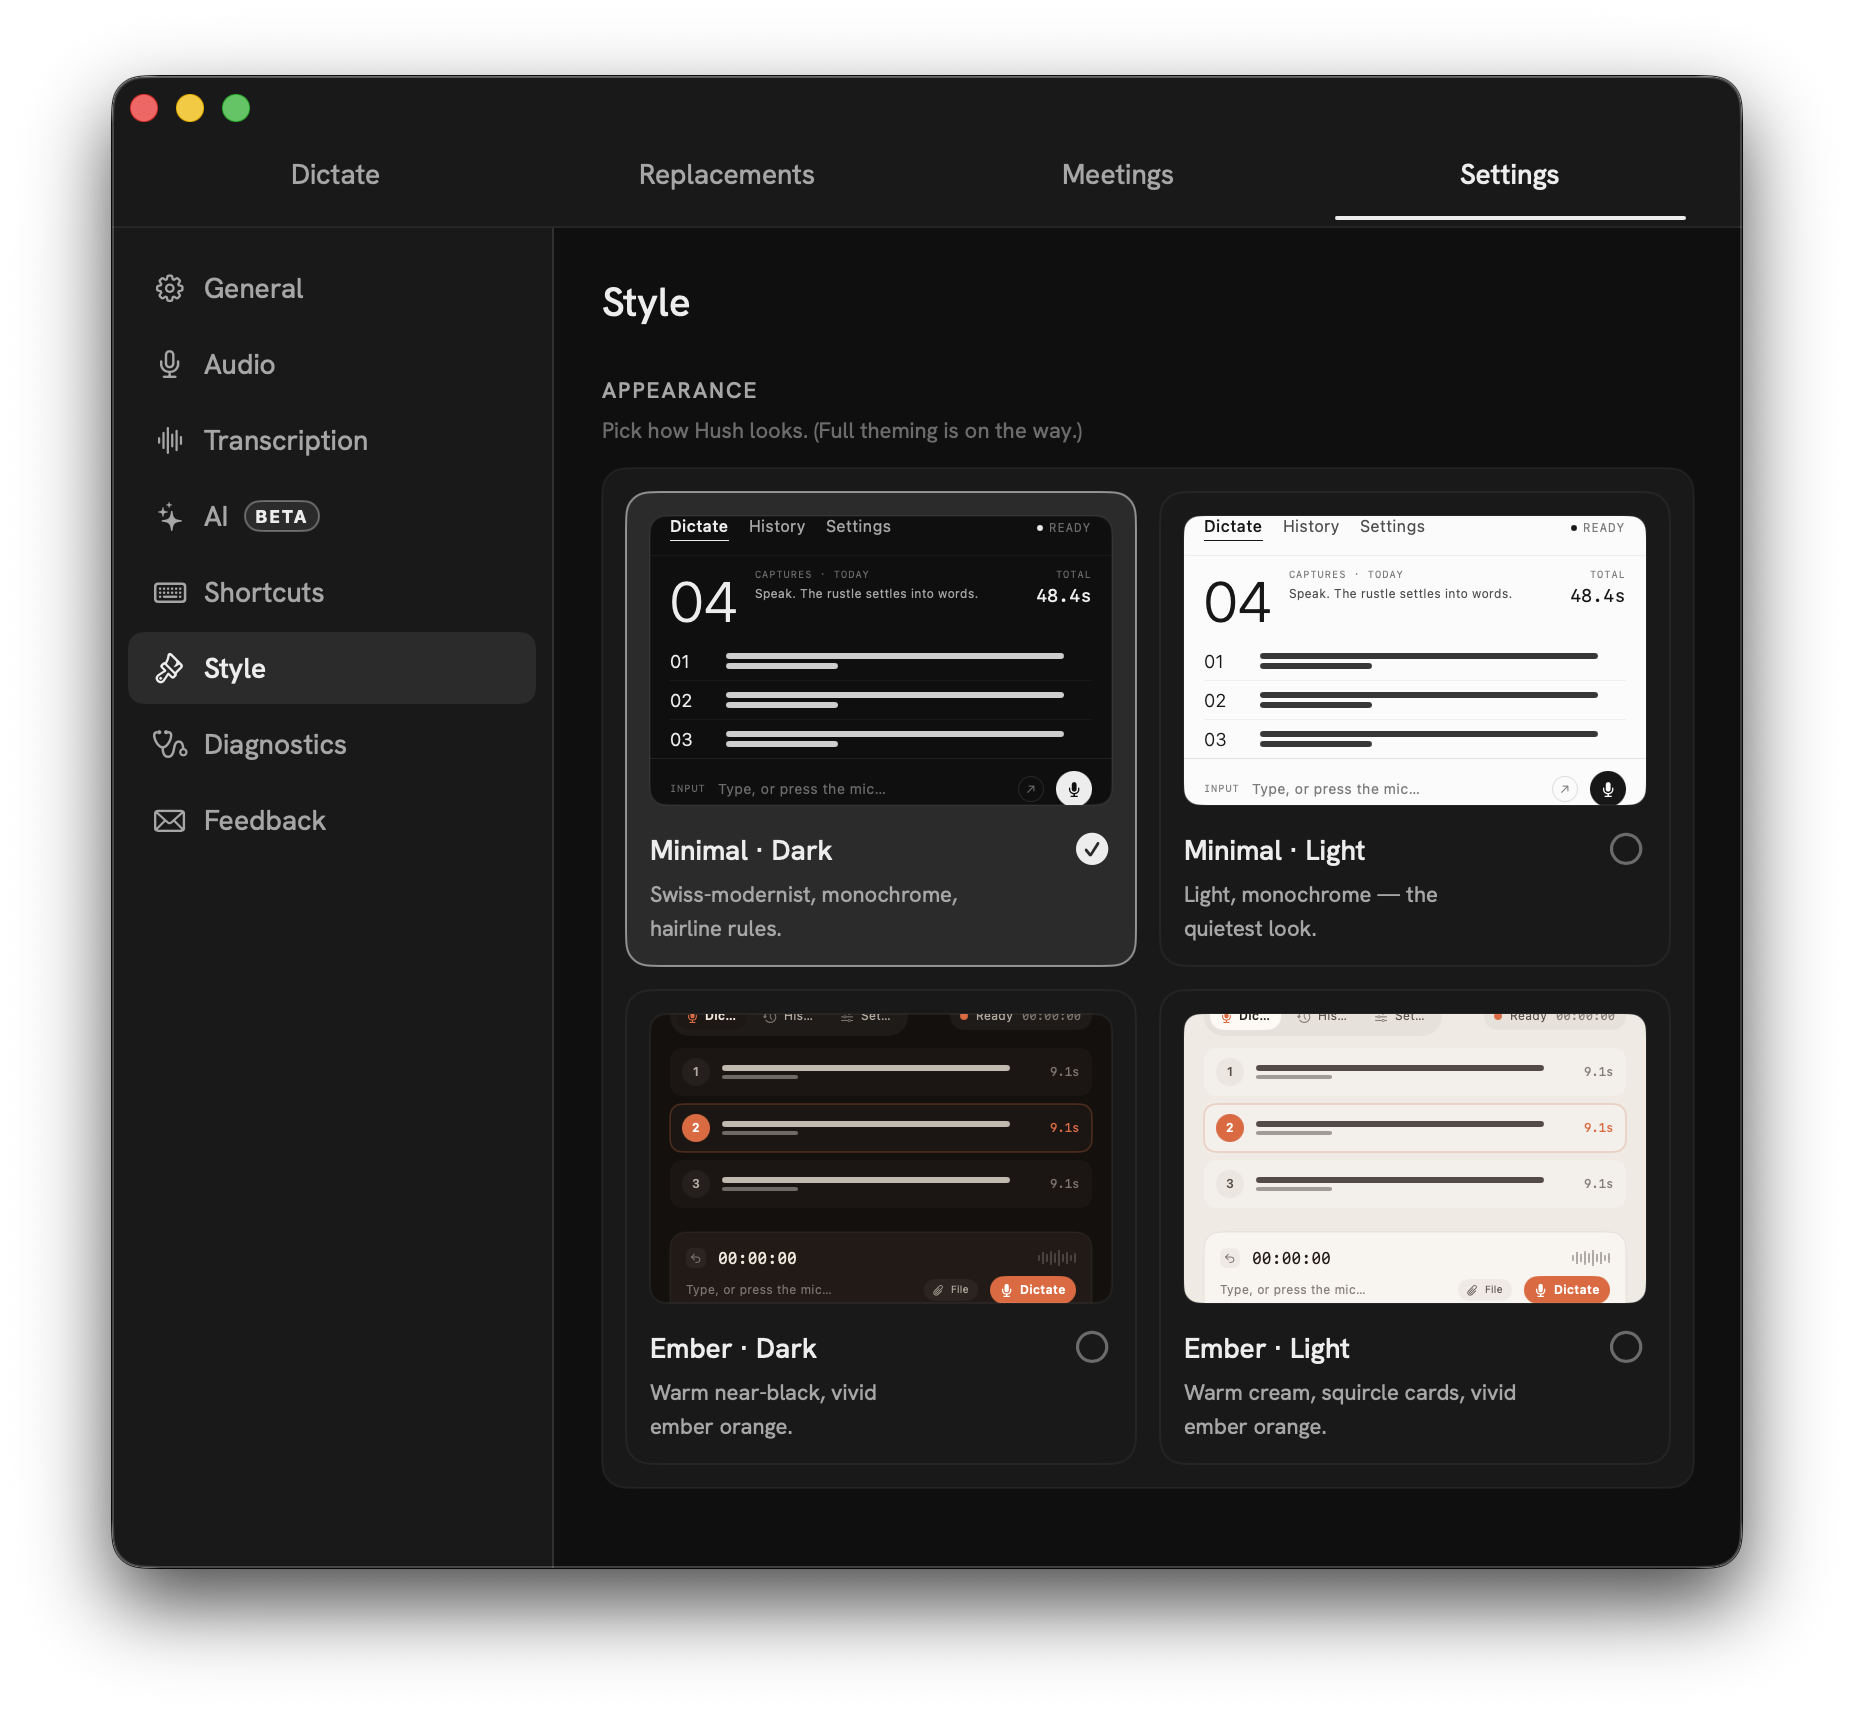
Settings, Style tab with theme picker

Style

Pick the look that fits your desktop.

Theme
Minimal Dark, Minimal Light, or Ember — switch live with preview thumbnails.
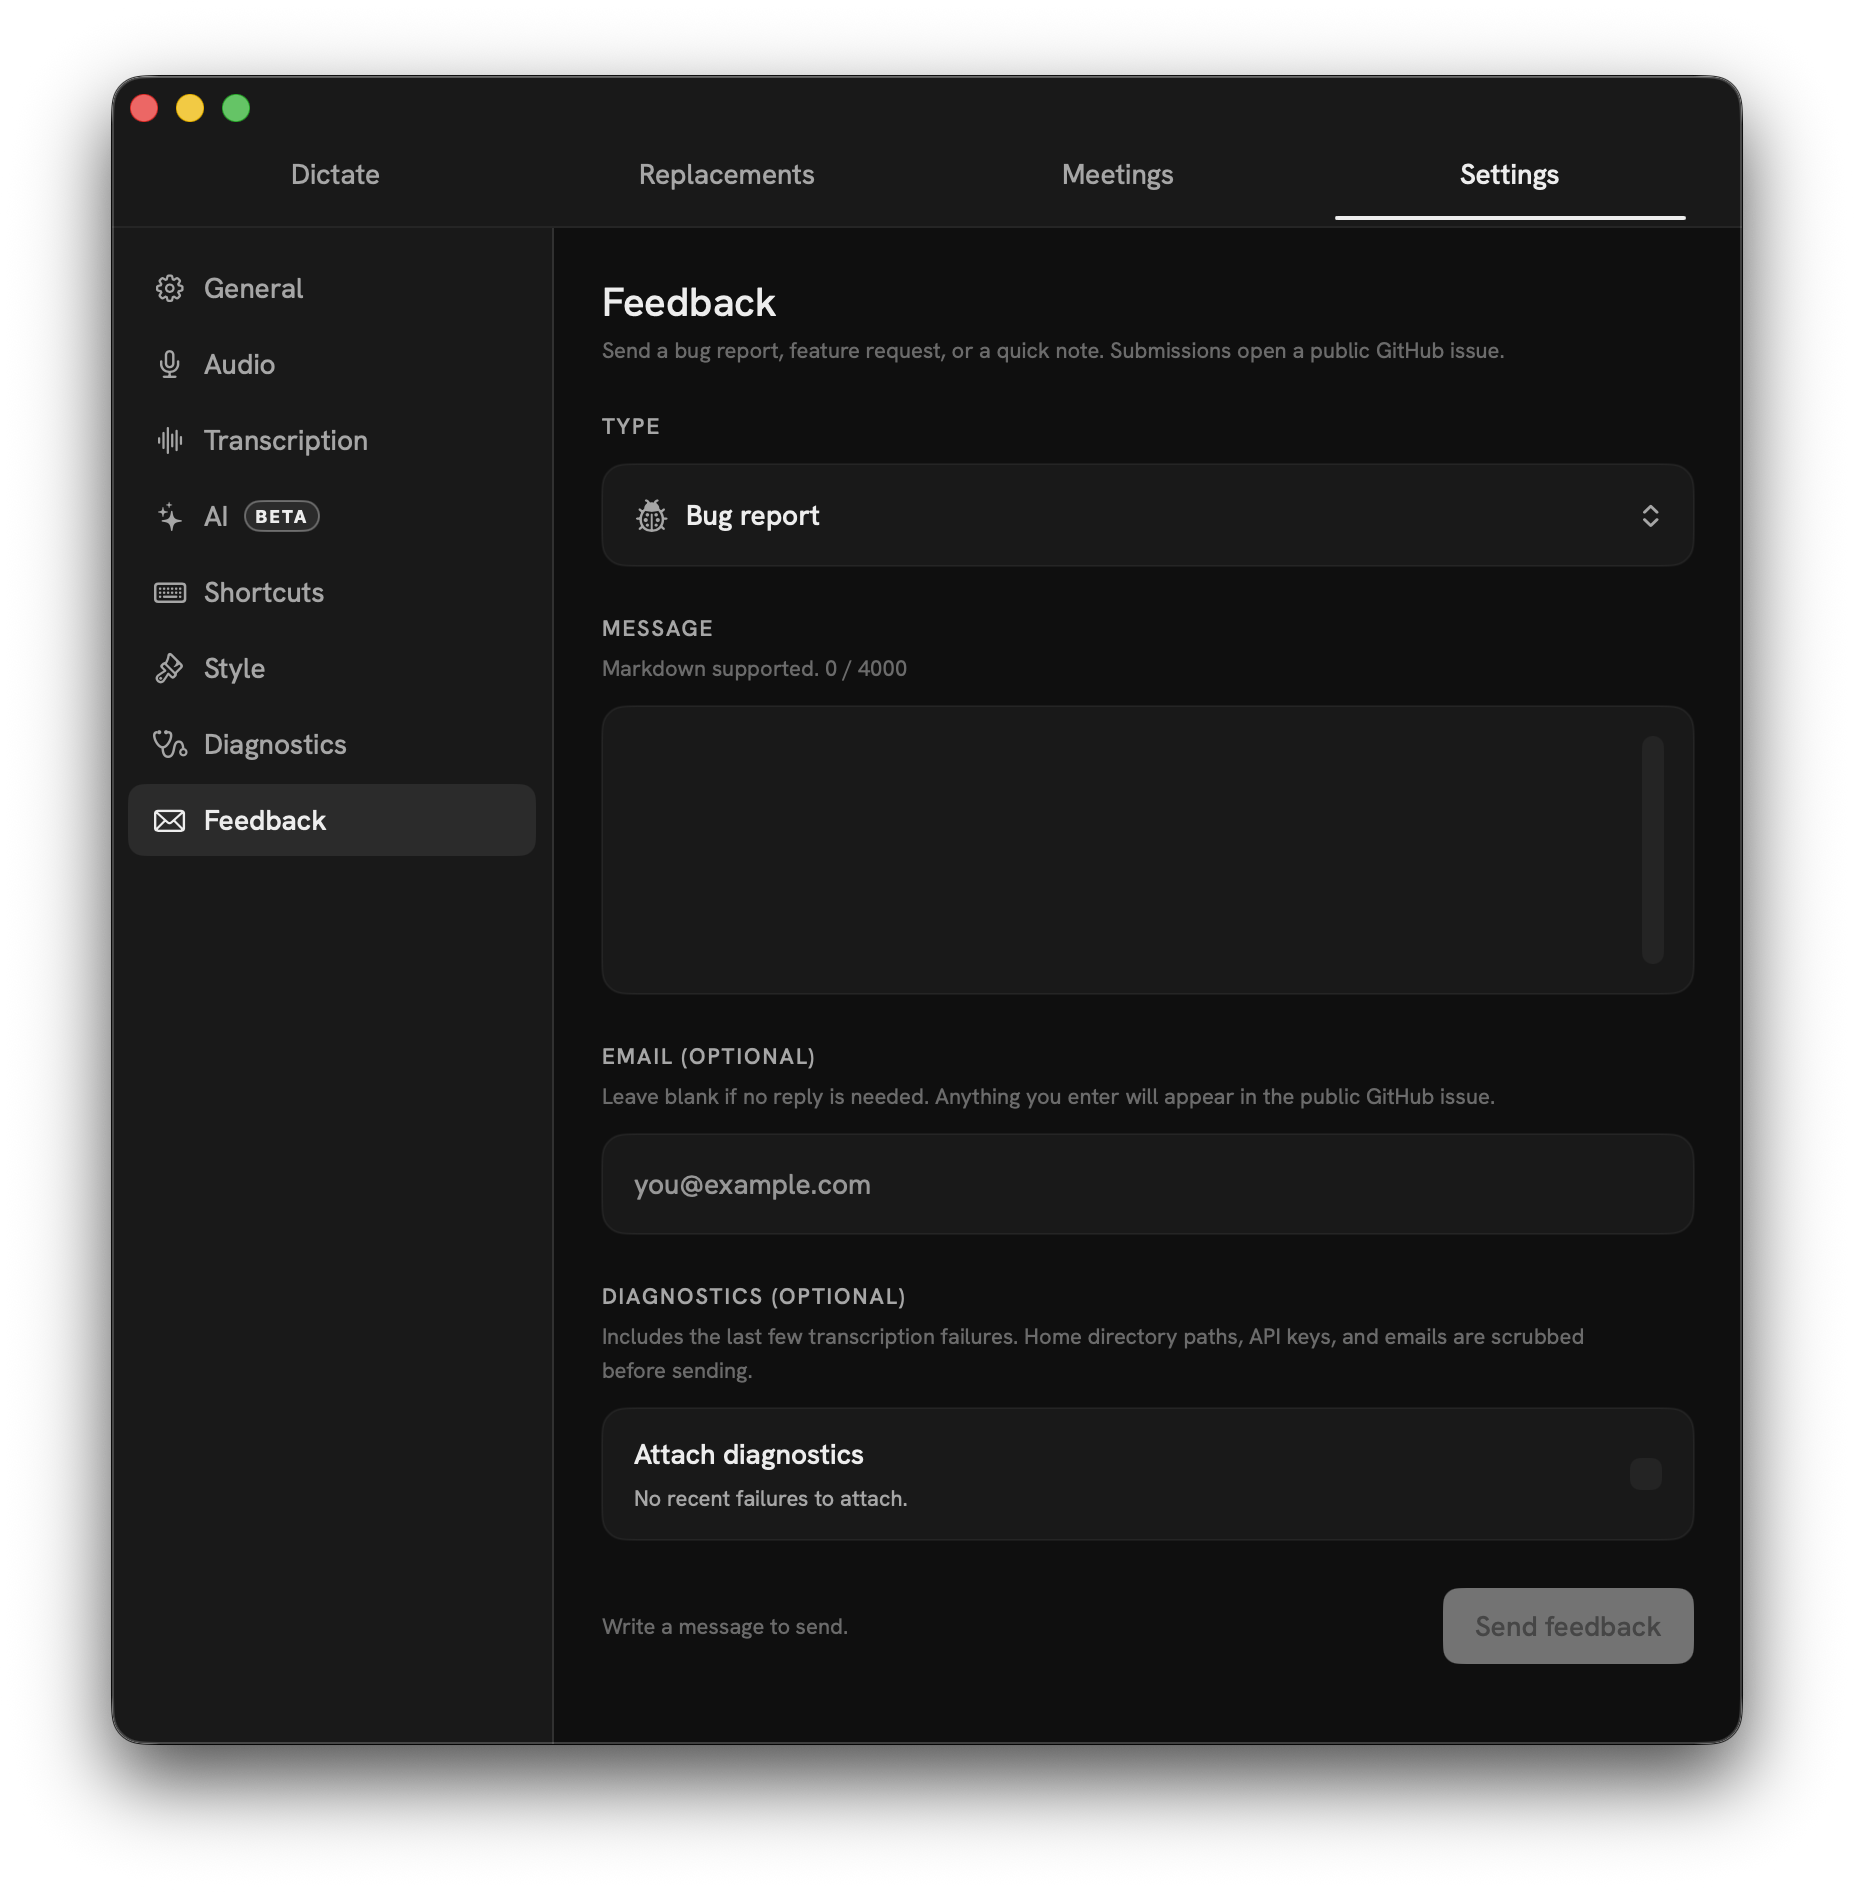
Settings, Feedback tab

Feedback

Report a bug or request a feature from inside the app.

Type
Bug report, feature request, or other.
Message & email
Your note, plus an optional reply-to address (not stored on the server).
Attach diagnostics
Include recent failure logs to help triage.
Submit
Posts to Hush's feedback service, which opens a GitHub issue.

Reference

Keyboard shortcuts

The defaults. Every chord is rebindable in Settings → Shortcuts.

Global chords work from any app; window shortcuts need a Hush window focused.
ShortcutActionNotes
fn SpacePush-to-talk dictationHold to record, release to insert at your cursor.
fn ⌃SpaceVoice editHold and speak a change. AI features must be on.
fn ⇧SpaceStart / stop meetingPress once to start, again to stop.
EscCancelCancels an in-flight recording or edit. Hush window focused.
⌘ ReturnApplyApplies a pending manual or voice edit.
⌘ ⌥ TabCycle languageSteps through your quick-switch language list.

Troubleshooting

If something's off.

  • The hotkey does nothing

    Hush needs Accessibility to capture global hotkeys and paste. Turn it on in Settings → General (or System Settings → Privacy & Security → Accessibility), then try again. The menu bar should read Ready.

  • No "Them" audio in a meeting

    System audio capture needs Screen Recording permission. Grant it, then restart the meeting. Watch for the in-app banner that warns when the other side stays silent.

  • The model download is slow or stuck

    WhisperKit fetches its model once (~632 MB for Large-v3-Turbo) and needs a network connection for that first download. On a slow link, switch to Apple Speech (macOS 26+) for zero download, or pick a smaller WhisperKit model.

  • Voice edit or Polish is greyed out

    Those are AI features. Enable AI features in Settings → AI and add your Anthropic or OpenAI API key. They stay off — and fully on-device — until you do.

  • My mic is too quiet

    In Settings → Audio, confirm the right input device, run Test microphone, and turn on Boost quiet audio with the sensitivity slider.

  • Text pasted into the wrong app

    Dictation pastes into whatever app is focused when you release the key. Click into your target field first, then hold fn Space.

Still stuck? Use Settings → Feedback in the app — it opens a tracked issue, optionally with diagnostics attached.